Calla flowers - how to plant and care
Content:
Calla is one of the most beautiful flowers that can be grown at home. Elegant, fragrant, it is relatively easy to care for, so it can be started by both an experienced florist and a beginner. Of course, talking about unusual calla lilies, caring for it at home and various subtleties of the content will be very useful.
Calla (calla) - what is this flower
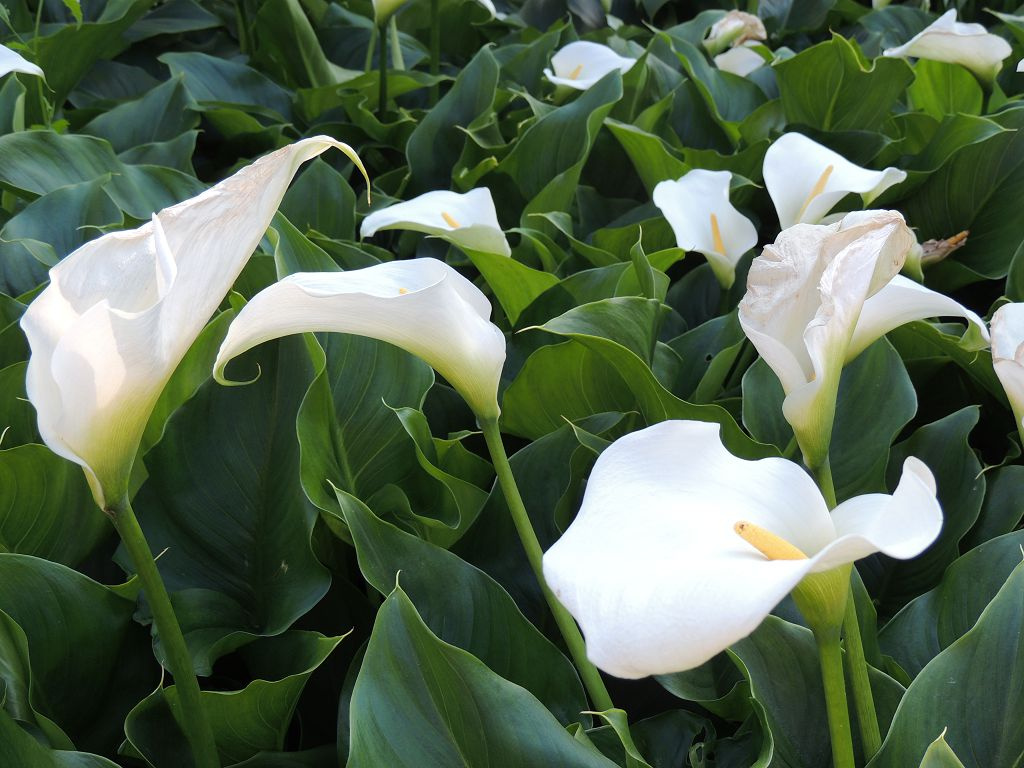
White classic variety
White calla lilies are quite common all over the world, including Russia. Here they are found almost throughout the entire territory - from the European part to the Far East, in temperate climates and more southern latitudes. Especially often the plant can be seen along the banks of rivers and lakes, and sometimes in swamps.
A short description of what it looks like
In general, calla flower is simple, but at the same time very graceful and elegant. Large leaves planted on long stems rise 5-100 cm above the ground, depending on the variety.
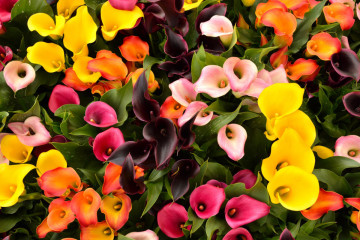
Flowers in the wild are quite small - usually no larger than 1 cm - and are always only white. They are similar in shape to a funnel - narrow at the base, they gracefully expand upward. But the varieties bred by breeders can boast not only of larger flowers, but also a rich selection of colors.
There are not only white, but also yellow, red, orange, pink, purple and even black flowers. It is not surprising that a calla in a pot can decorate any windowsill, not to mention a garden.
Popular plant species
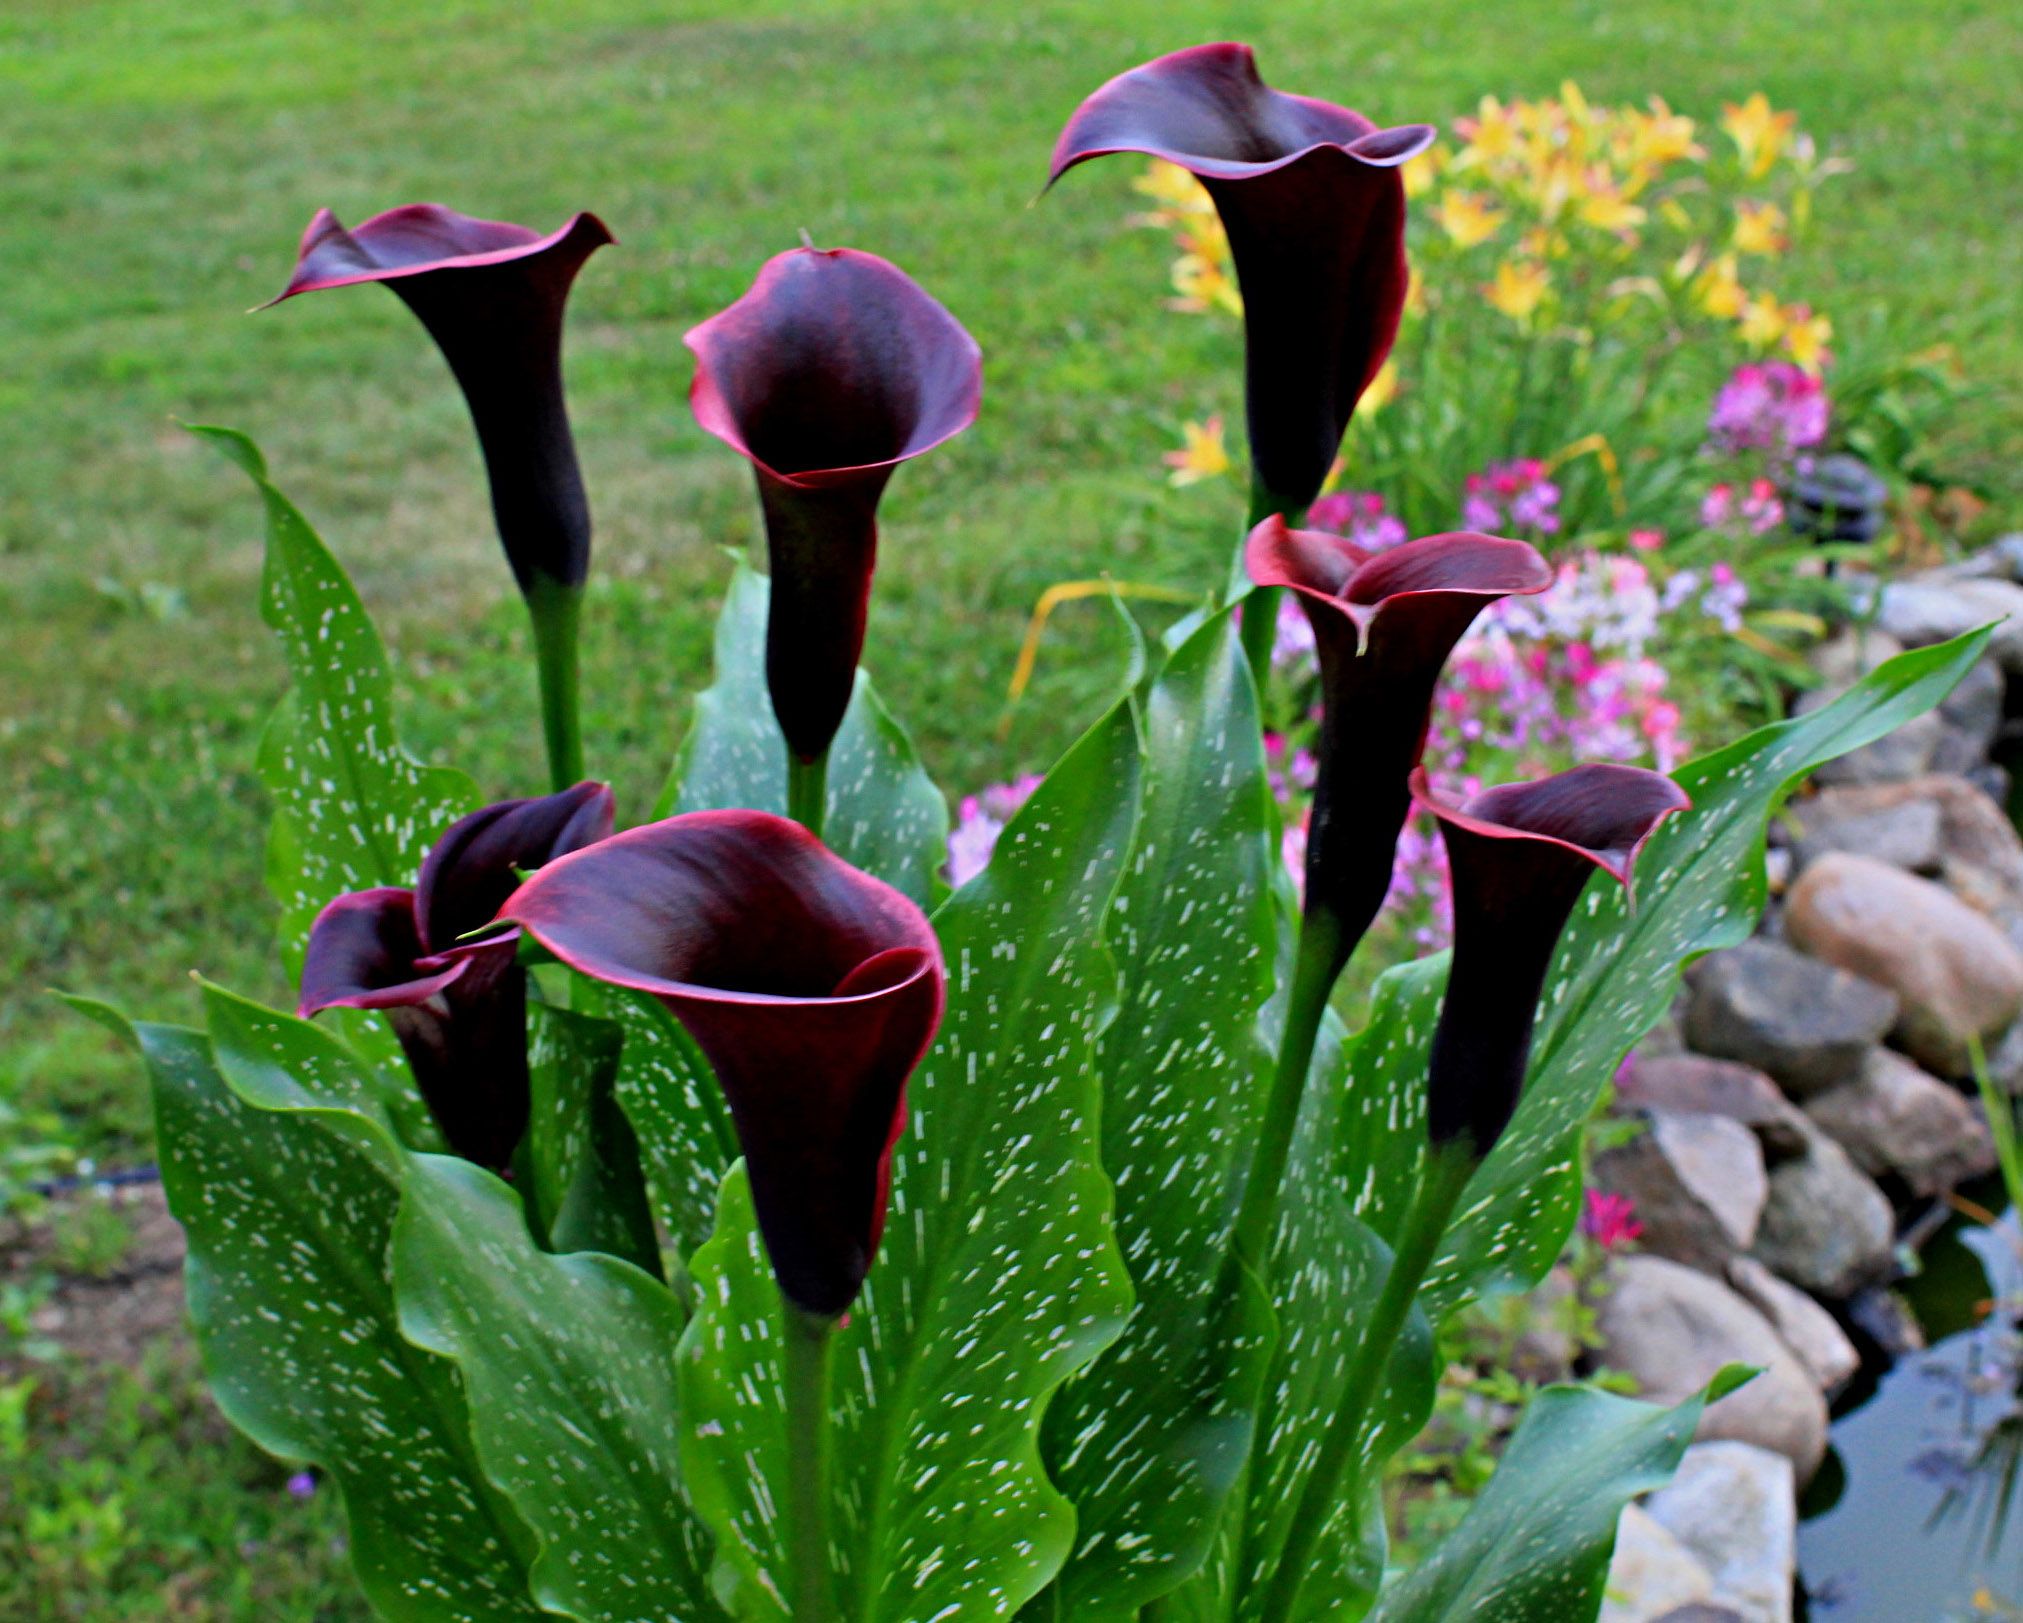
An exquisite shade is rare.
It is quite problematic to list all types of calla lilies - there are too many of them to fit in one article. Therefore, it makes sense to describe several of the most striking varieties, the cultivation of which may be of interest to flower growers.
Calla elliottiana
A very miniature plant that grows only up to 5 cm in the wild. But at the same time, the leaves are dark green, large, beautiful, decorated with many white dots.
The inflorescences have green bases and a golden veil. On the basis of this species, domestic calla lilies were bred - Red Alert (with scarlet inflorescences) and Black Magic (up to a meter high and 15 cm long inflorescences).
Ethiopian Calla (Calla aethiopica)
This type of plant is the largest - it reaches a height of 100 cm during flowering.Also known as Zantedeschia aethiopica.
The leaves are dark green in color and have a shiny surface and are heart-shaped or oval in shape. The underground part does not have tubers, it consists entirely of flexible roots.
Remann (Calla rehmannii)
This species also cannot be called miniature - in height it may well reach 70 cm.The leaves are dense green, elongated.
In the fall, the above-ground part dies off in order to blossom again in the spring and delight others.The inflorescence has a veil of red, lilac or purple. Many interesting varieties have been bred from this wild species, including:
- Askari - flowers have a dark red veil surrounded by a strip of cream shade.
- Odessa - inflorescences are almost black, with a dark red base.
- Crystal Blush - flowers are white during flowering, and then change color to pinkish.
- Garnet Glow is a miniature plant (no more than 55 cm), blooms from June to September with large red flowers with a pomegranate tint.
Growing calla lilies at home
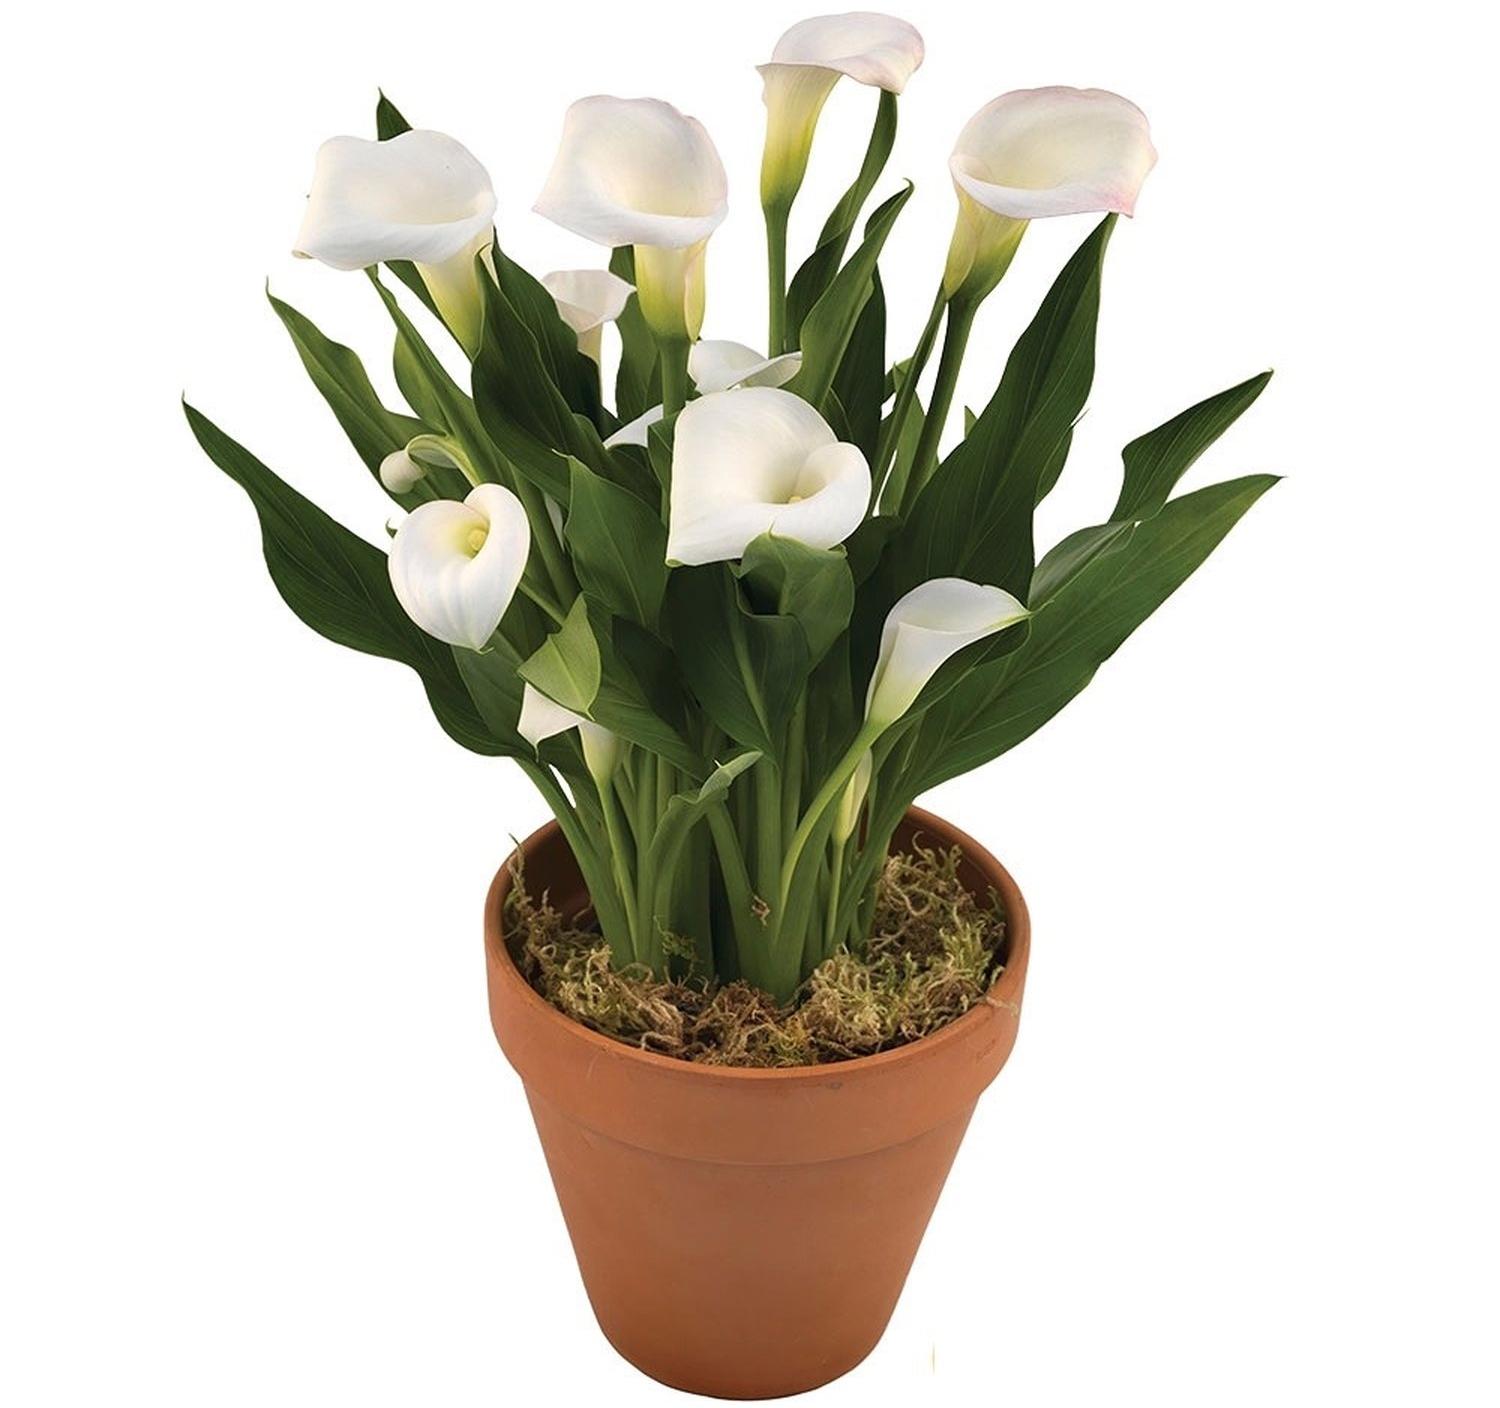
The flower is great for growing in pots
As already mentioned, in modern varieties of calla lilies, flowers are beautiful and diverse enough to interest even a sophisticated grower. However, they are also of interest to beginners.
It is not surprising that many people want to grow them right in the apartment - such a plant will add beauty and coziness to any room. But, of course, in order for the plant to delight with grace, you need to learn how to provide the room calla with appropriate care. Of course, it all starts with the landing.
How to plant a flower correctly
In general, modern calla lilies are home flowers; it is not at all difficult to grow them in a pot. But here you need to know certain nuances that will allow the plant to feel as comfortable as possible, develop quickly and bloom for a long time. Therefore, it is worthwhile to deal with the issue in stages.
- Flower container size
It should be noted right away that it is advisable to use a rather large pot - a diameter of 40 cm and a depth of 50 cm.
The fact is that the flower grows quite quickly, the root system is also developing rapidly. Therefore, if the pot is too small, the calla will constantly experience discomfort and may well get sick. And if it does bloom, it will be small flowers. Of course, it will need to be transplanted as soon as possible, and any transplant is a serious stress for any plant.
- Soil quality
The choice of suitable soil must also be taken very seriously.
Experts recommend using a special nutrient mixture made from leafy soil, compost and turf, mixed in equal parts.
When growing calla lilies in pots, it is advisable to renew the topsoil every three to four months.
Of course, the bottom of the pot must be filled with drainage - a layer of about 5-7 cm. Pebbles, expanded clay or large crushed stone are suitable as drainage.
- Landing
When the pot is selected and filled with suitable soil, you can proceed to the last stage - planting. Of course, you need to plant correctly - then the flower will rise quickly and will develop rapidly.
Usually tubers are used for planting. Planting depth depends on their size. For example, it is advisable to bury small tubers by 6 cm.For large ones, this indicator can be increased to 12 cm.
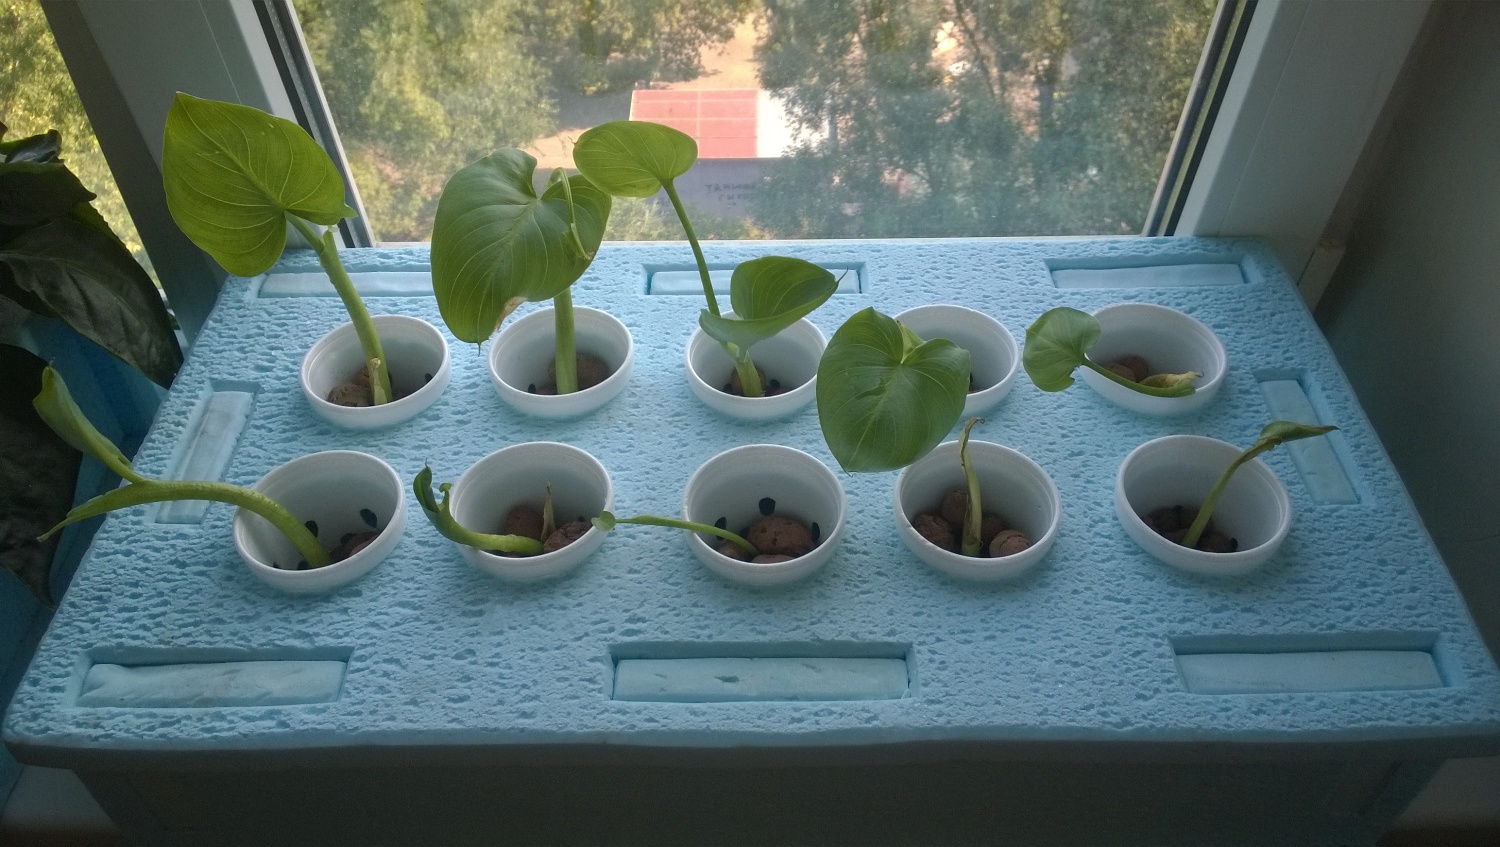
Growing young seedlings in individual pots
Some beginners are wondering why calla lilies cannot be planted at a shallower depth, because then the sprouts will appear faster. But if you do this, then as the leaves grow, they will simply lie down under their weight - at the base, the soil will not be able to hold them.
After planting, the ground must be abundantly moistened, covered with film or glass on top and removed to a warm place. When the first shoots appear, the film is removed, and the pot is placed in a well-lit place, but protected from direct sunlight.
How to care for calla lilies in a pot at home
In general, if the reader is interested in zantedeschia, home care is quite simple - no more difficult than for most colors. But still, it will be very useful to understand the individual stages.
Illumination and temperature conditions
Good lighting is very important for the plant.At least 10 hours a day, it should be well lit in order to receive all the nutrients necessary for growth and flowering.
If this figure falls, then the calla will no longer bloom - just throw out new leaves. In addition, varieties with colored buds suffer and their flowers fade. Therefore, in winter, it is necessary to illuminate the calla with special lamps.
With the temperature regime, everything is easier. In summer, during the flowering period, the optimal indicator is +18 .. + 22 degrees. In winter, during rest (lasts about two months), it is better to lower the temperature to +10 .. + 12 degrees.
Watering rules and humidity
In general, calla grows in the wild mainly in swamps and river banks. Therefore, it tolerates drought very badly - large leaves quickly lose moisture, and with insufficient watering, the plant may well dry out.
On the other hand, with an excess of moisture in the soil, the roots begin to rot. So, you need to water it correctly and in a timely manner - only in this case the calla will actively grow and bloom regularly.
A sign that it is time to water the plant is drying out of the soil. If it is 2-3 cm dry, then it's time to moisturize it.
The optimum humidity for calla lilies is 70-80%. Therefore, you need to spray at least once, and preferably twice a day.
Top dressing
Also, do not forget about feeding. In the first days after planting, it is advisable to apply phosphorus fertilizers - thanks to them, the root system develops faster and the plant strengthens. After that, you can switch to nitrogen fertilization so that the plant quickly builds up a sufficient green mass.
Subsequently, it is worth using phosphorus and nitrogen fertilizers only when transplanting. But potash dressings, which contribute to the appearance of new buds, can be applied at the end of each spring.
With good care, one large, healthy flower may well throw up to 10 flowers per season.
Calla lilies in the apartment, as often happens
Calla lilies bloom surprisingly beautifully, filling the house with an indescribable aroma - delicate and pleasant. It usually blooms only once a year - in summer. But flowering lasts up to two to three months.
Of course, when a dozen large, white or multi-colored flowers bloom on one plant, this is a fascinating sight. For the sake of this, it is worth caring for a calla for a whole year, waiting for it to finally bloom.
Reproduction in an apartment
Calla can be propagated in a variety of ways. Moreover, each of them has certain advantages. Therefore, an experienced florist should have an idea of all the possible options. Even then, white, red, purple and yellow calla lilies will definitely delight the eye in his apartment.
Seeds
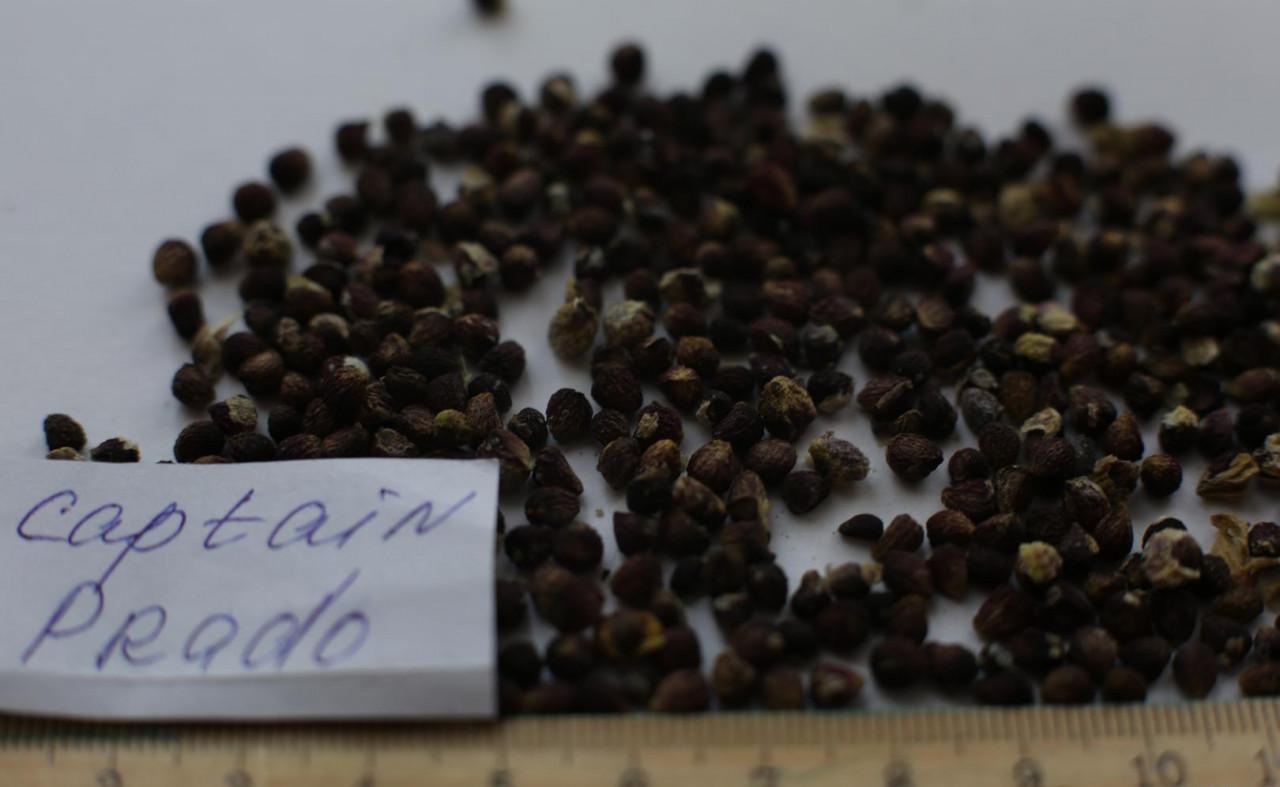
Calla seeds
For reproduction of the plant, it is quite possible to use seeds, although in most cases this option is used only by breeders - the germination of seeds is low, and with such reproduction you will have to wait a year longer for flowers.
For reproduction, you need to follow these instructions:
- The seeds are soaked in a solution of potassium humate for 5-6 hours to stimulate their germination.
- Spread out on a damp napkin and cover with another one on top, then put it in a bag for 6-8 days, putting it in a warm place for germination. If necessary, you need to moisten the napkins with a spray bottle.
- Sprouted seeds are sown in a tray with soil, where they are left until germination - you can close the top with a film so that you do not have to constantly water the soil.
- When shoots appear, they need to be hardened by taking them outside on warm days.
- Grown plants are planted in open ground or pots for home growing.
Tubers
The tuber propagation method is much more popular - this not only saves time, but also ensures that the plant is exactly the same as its parent. In addition, you can grow flowers outside - calla will bloom in the summer.
When buying tubers, you need to make sure that they are even, smooth, without rottenness and wilted areas.
First, the tubers are left for several months in a cool place at a temperature of +3 .. + 5 degrees - a simple refrigerator is quite suitable.
In early April, the tubers are planted in pots and seedlings are grown. In late spring - early summer, you can plant it in open ground according to the scheme 20 × 20 cm for small varieties, 35 × 35 cm for medium varieties and 50 × 50 cm for large ones.
Regular watering and feeding will allow the plant to develop quickly and evenly.
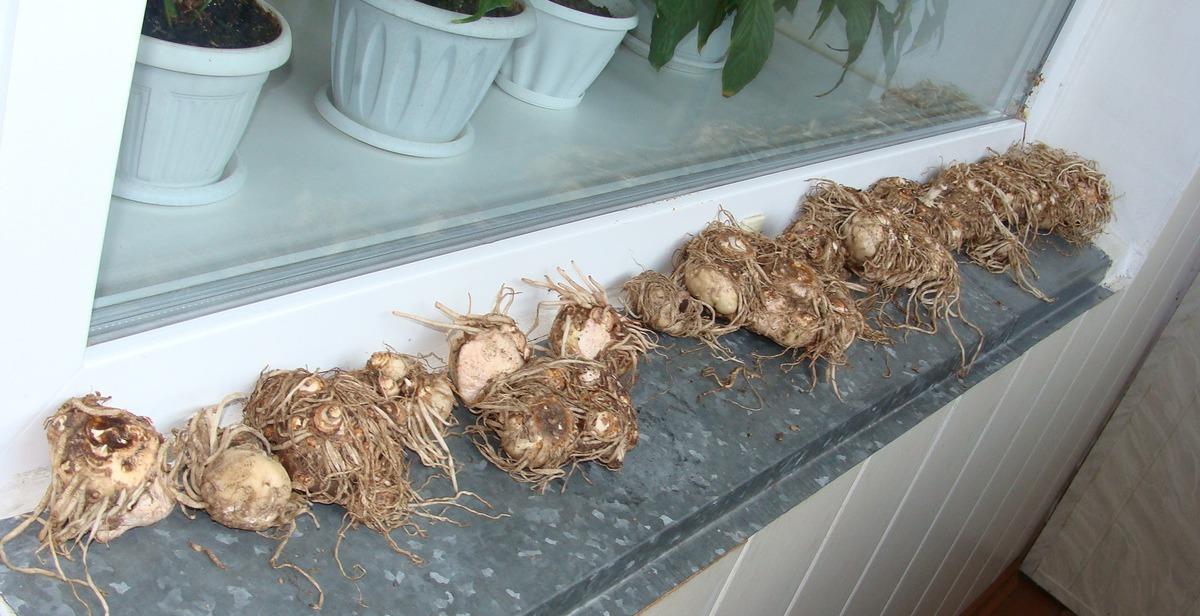
Calla tubers
By dividing the rhizome
Finally, calla varieties with a tree-like root system can be propagated by division. To do this, in the fall, carefully separate the root collar from the main rhizome. At the same time, you need to try to leave more land on it. The neck (baby) is planted in a spacious pot.
It is advisable to store it in a dark, closed room with high humidity. The optimum temperature is from +12 to +15 degrees Celsius.
In the spring, the root will sprout, and already in late May or early June it can be planted in open ground.
The advantages of such a solution are quite numerous:
- saving time,
- preservation of the characteristics inherent in the mother plant,
- high survival rate.
Therefore, it is not surprising that many growers prefer this particular method of reproduction of calla lilies.
Possible problems and difficulties
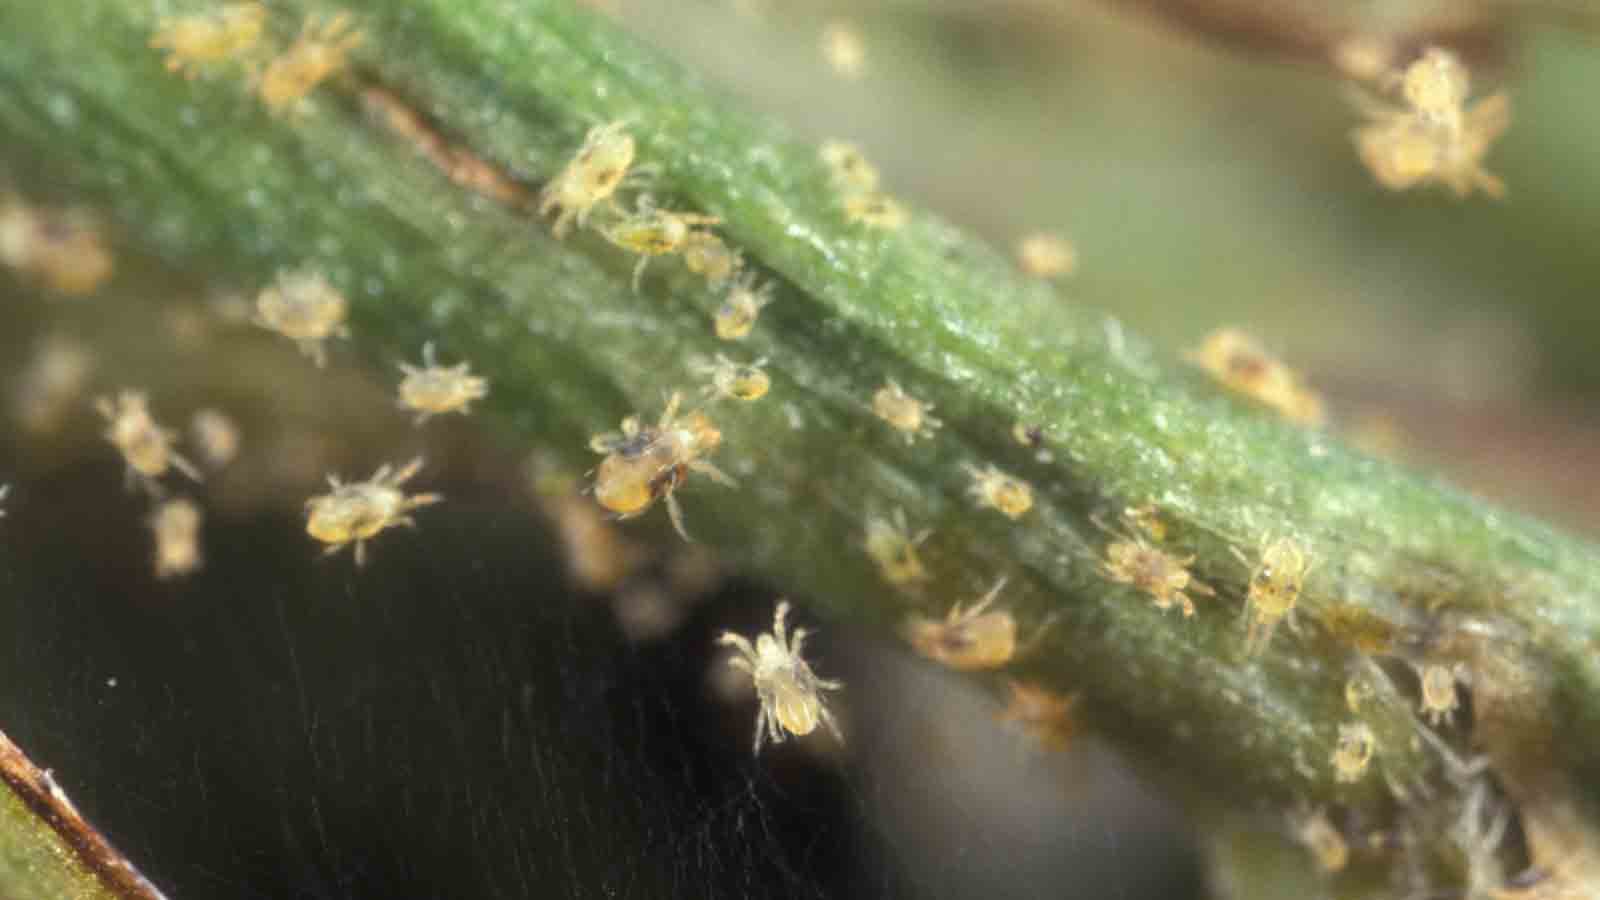
A spider mite can destroy a delicate plant
Of course, when growing calla lilies, you can face various problems - first of all, diseases. Usually this:
- brown rot
- gray rot,
- anthracnose.
All these are fungal diseases. Therefore, the treatment should be the same - spraying with fungicides. This usually fixes the problem. To prevent it from reoccurring, you need to make sure that the plant gets enough sunlight and does not suffer from excess moisture. Indeed, it is in such conditions that the fungi that cause these diseases most often actively multiply. However, brown rot can also be caused by excess nitrogen fertilization.
Sometimes insect pests also cause problems. Most often it is aphid or spider mite, and if aphids are usually annoying only when grown outdoors, then the tick can also infect domestic plants. The solution is quite simple - you can spray the leaves with soapy water or special preparations (insecticides).
After studying the article and remembering the basic rules, even a novice florist can easily grow gorgeous flowers on a windowsill or in a garden. At the same time, today there is definitely an opportunity to choose a variety of calla lilies that no one else has.