Garden calla lilies - planting and care in the open field
Content:
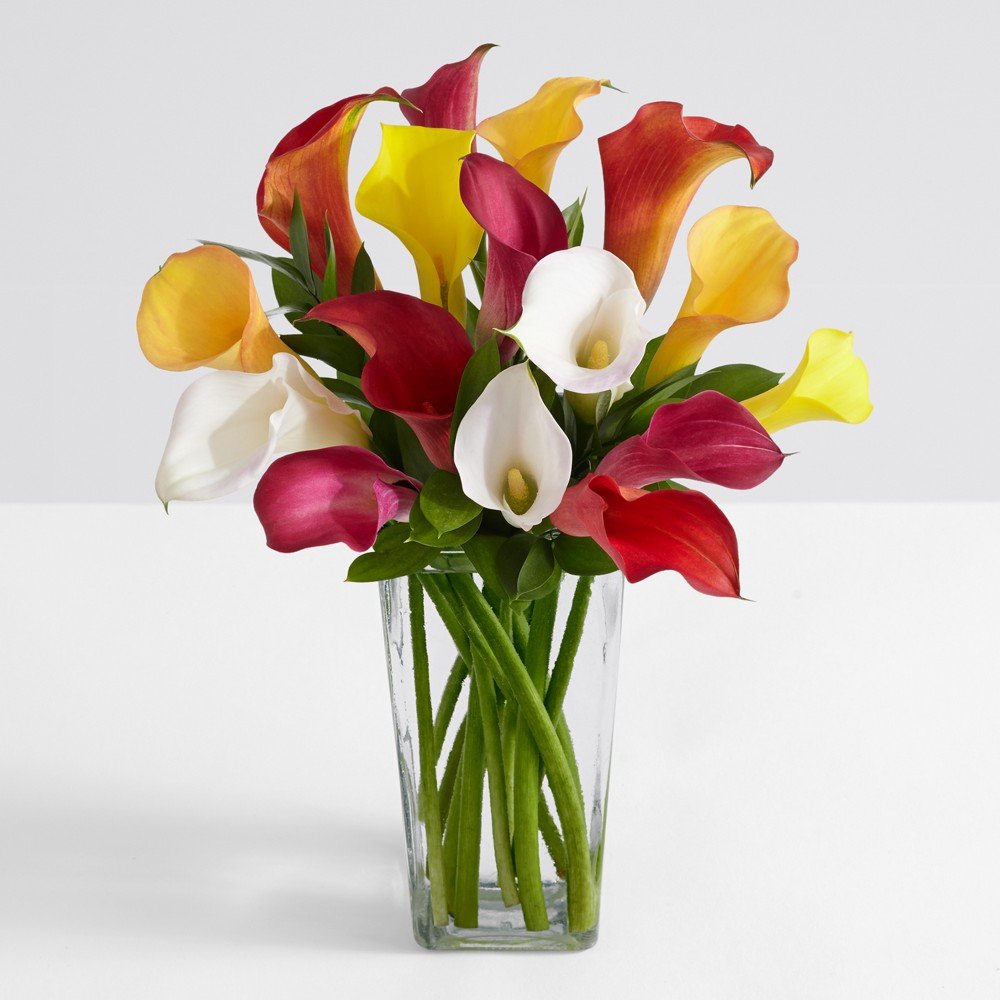
Calla, or zantedeschia, is a perennial plant of the Aroid family, or Aronnikovye. Distinguish calla Ethiopian - rhizome, which blooms in autumn and winter with white flowers, from March to June is in a dormant period. South African calla is a tuberous or bulbous plant, the color of its flowers is different, it blooms in the summer. Both species are grown in the country and in the apartment. The plant is distinguished by its original flower: on a long peduncle there is a yellow inflorescence in the form of an ear, wrapped in a funnel-shaped blanket, which has its own color in different species.
The homeland of the flower is the territories of South America and Africa. Breeders have developed a huge number of varieties that are grown as indoor and outdoor flowers. Calla lilies planting and caring in the open field, which require certain knowledge and skills, attract not only knowledgeable flower growers, but also beginners with their arrow-shaped succulent leaves and an amazing flower.
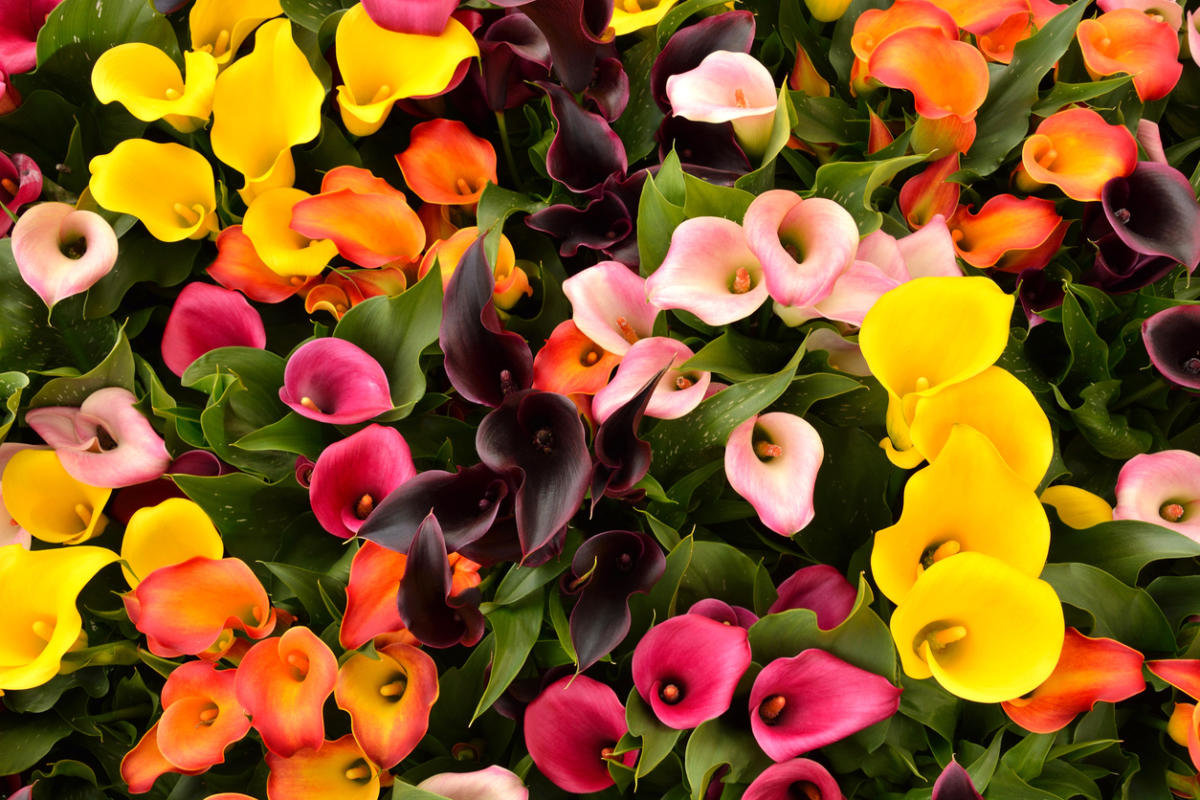
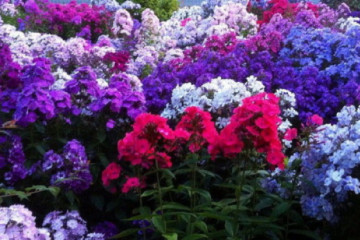
A riot of colors of blooming calla lilies
Timing for planting in spring
By mid-May, when the time of spring frosts has passed, and the soil at a depth of 15 cm warms up to 15ᵒC, calla lilies are planted in the garden, this corresponds to the weather in central Russia. Planting dates in the southern regions are earlier: mid-April. In the north of the country, in the Urals and Siberia, it is advisable to wait until the end of May or even the beginning of June.
Stages of preparation for planting calla lilies
April-May is the time of "awakening" of corm calla lilies. At this time, preparations for landing begin:
- Open the boxes they hibernate in and take out the tubers.
- Peel off the paper wrappers.
- Examine for fungal infections.
- Treat with fungicide or potassium permanganate solution.
- Separate the "kids" by breaking them off from the jumper and treating the place where they are broken with green paint.
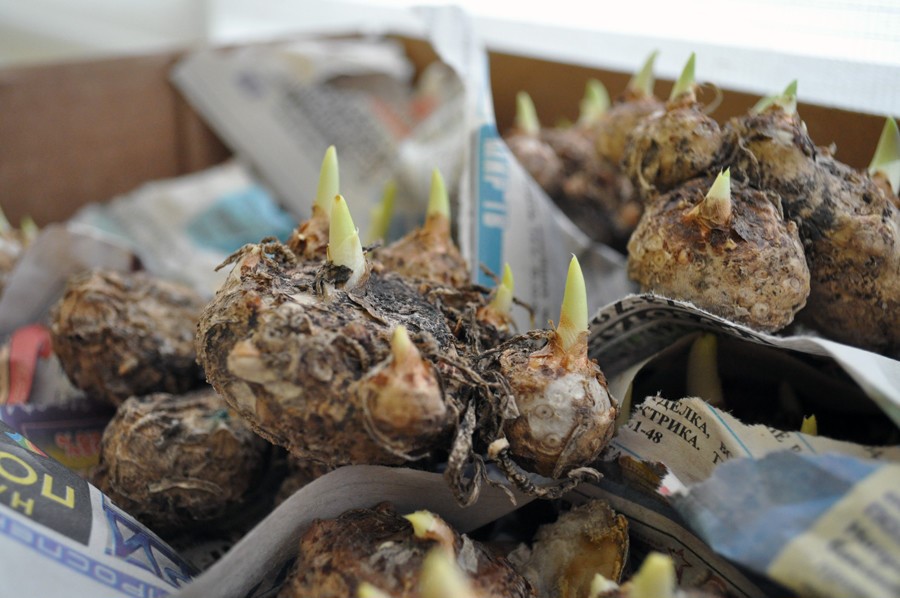
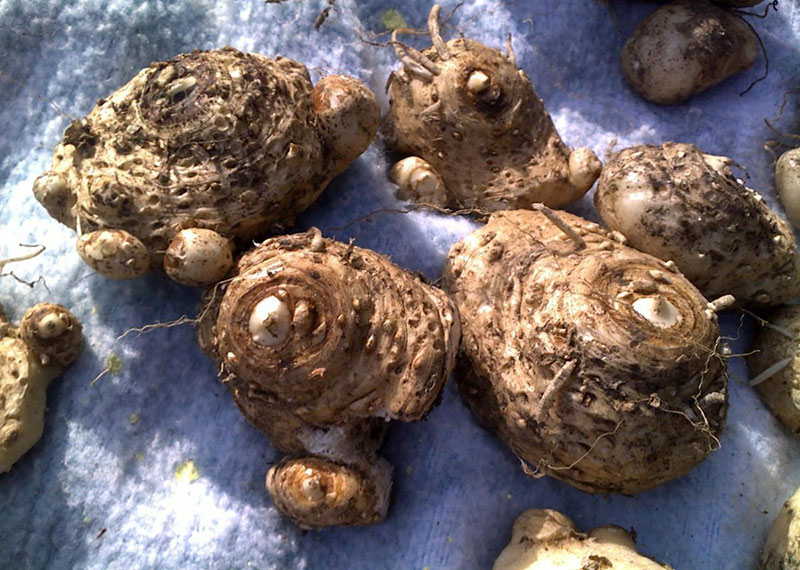
The appearance of sprouts in corms "awakened" after wintering
Rules for choosing planting material
A suitable bulb for planting should be large and have a dense structure that resembles a potato tuber. A wrinkled and dented bulb will not produce a normal plant. Sick and damaged bulbs are discarded for treatment. The selected material is placed in trays and placed in a cool place with a temperature of 5-7 ° C, regularly ventilated.
Digging and storing calla lilies in winter
Calla lilies are not provided for wintering in the garden, this plant is not frost-resistant, withstands up to -2ᵒС. Every fall, the bulbs are dug up.
When the callas have faded and wilted, before the cold weather, carefully dig out the tubers so as not to damage the stems. The dug tubers with stems are placed in cardboard or wooden boxes and placed in a dry room for 2 weeks to dry. Then carefully separate the dried stems and roots from the bulb.
Dug out corms after drying
The latter are washed well and treated in a solution of potassium permanganate, then washed again under running water. When the water drains, the bulbs are removed for a week in a dark, ventilated room to dry.
The prepared tubers are ready for winter storage. Before that, once again inspect all the material obtained to identify damage and rot. The detected defects must be removed with a sharp knife. Dry for several hours, then treat all sections with brilliant green or activated carbon.
The planting material for breeding is wrapped in paper, each tuber separately, placed in boxes with holes and stored in a ventilated room with a temperature of 10-12ᵒС. Check regularly for rot and dryness.
Germinating the bulbs before planting
Tuber sprouting accelerates plant development, which leads to earlier and longer flowering, and also contributes to increased resistance to frost and disease. To provide a sufficient amount of daylight, the process begins in mid-March, if earlier, artificial additional lighting will have to be used.
In order to "wake up" tubers that have not hatched from wintering, they are kept in a solution of potassium permanganate for 30 minutes, then the damaged areas are examined and removed with a sharp knife, treating the sections with brilliant green. Prepare containers for planting:
- The pots are taken with holes for water drainage.
- A drainage layer of small stones and sand is laid on the bottom.
- The prepared calcined soil is laid out on top.
- Tubers are planted, not deeply burying into the ground, up to 2 cm.
The containers are installed in a room with a temperature of up to 20ᵒС. They take care of the planted tubers, starting to water after a week. Water it 2 times a week, making sure that the soil is moist, but the water does not stagnate. After 15 days, the first leaves will appear.
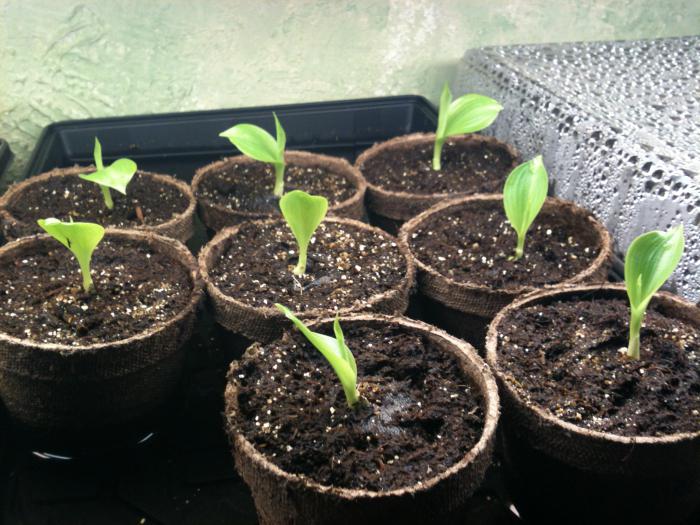
Sprouting calla lilies in pots at home to transplant outdoors
Loosening the soil
An indispensable element of care is loosening the soil, this ensures the supply of oxygen to the root system. The procedure should be carried out carefully so as not to damage the roots.
Natural loosening is created by earthworms. Having increased their population on the site, they achieve, in addition to loosening, also enrichment of the soil with nutrients.
Germination dates
Calla lilies are planted in open ground when the frost stops, not earlier than mid-May. Non-germinated bulbs, planted immediately on a flower bed, will bloom much later, they need to adapt to new conditions and build up the root system, only after that the plant itself begins to grow. The first shoots will appear in 2-3 weeks. For earlier flowering, the awakened bulbs are germinated at home. To get a mature plant by early summer, they are planted in March. In this case, a plant with leaves is transplanted into open ground, which immediately begins to grow.
Growing from a bulb and gardening
Before planting calla lilies, the bulbs need to be prepared. They are kept in a solution of potassium permanganate for 30 minutes, then they are dried and cut off the damaged and diseased areas, slightly capturing healthy ones. Sections are treated with brilliant green. How to plant calla lilies in open ground: they are planted in a flowerbed with dug and fertilized soil, maintaining a distance between them of 30-40 cm and embedding to a depth of 5-10 cm:
- Large ones dig in deeper;
- Small ones are slightly sprinkled with earth.
After planting, the root system is first formed, at this time watering is not needed, seedlings appear in 2-3 weeks. Only after the end of the formation of the roots, the forces of the flower are directed to the growth of the plant itself.
The main components of outdoor flower care are:
- Timely watering;
- Making the necessary dressings;
- Weed weeding;
- Regular loosening of the soil.
Subject to all the rules of care, calla lilies will begin to bloom in a month and a half and will delight with beautiful flowers until autumn.
Watering and spraying
Garden callas are a moisture-loving plant, watering is an important component of flower care. After planting, calla lilies are not watered, observing the "dry mode". Watering is started after the first shoots appear, somewhere in 2-3 weeks after planting.
After the appearance of several leaves, watering is carried out more often: 1-2 times a week. How often you water your plant depends on the weather. Watering correctly should be frequent but moderate to keep the soil moist. Calla does not like excessive moisture in the soil, but it should not be allowed to dry out. In drought, watering should be more abundant, in addition, the leaves should be sprayed and moistened.
Methods and timing of top dressing
The plant responds well to feeding, each period requires different fertilizers. Because calla lilies love acidic soil, it needs to be acidified.
Fertilizer types and required amount
| Application time and how many times | What fertilizers | Consumption rate | Note |
| Landing | Complex mineral | 30-40 g / sq. m | To provide food for the whole season |
| 3 times per season | Citric or acetic acid | 1 tablespoon in a bucket of water | To maintain an optimal level of soil acidity |
| Once every 3 weeks | Special for corms | according to instructions | For the formation and growth of bulbs |
| Flowering period | Potassium sulphate | 1 tablespoon per plant | Sprinkle around the plant, spread evenly and sprinkle a little earth |
Disease and pest control
Callas are relatively resistant to disease and pest infestations, but if this happens, it is necessary to immediately begin to eliminate the problems.
Possible plant diseases, methods of struggle
| Disease | External manifestations | Causes and remedies |
| Yellow spot and yellow streaking (viral) | The appearance of light ring spots and curly leaves, deformation of flowers, light strokes on the peduncles. | The peddler is thrips. Insect extermination. |
| Bacterial wet rot | The appearance of rot at the petioles of leaves and peduncles at ground level, followed by their breaking. Weeping roots, rotten. The tubers have brown dents. | Sick plants are destroyed. Prevention - planting only healthy tubers. |
Pests and methods of struggle
| Pests | Signs of presence | Control methods and prevention |
| Aphid | Leaves, buds and flowers turn yellow, curl. In case of severe damage - sticky discharge from aphids. | With a weak lesion, wash off with water and laundry soap. With strong - treatment with drugs: "Antitlin", "Aktellik", "Fitoverm", etc. After 4-5 days, the treatment is repeated. |
| Spider mite | Dry hot weather contributes to the appearance. On the leaves - yellowish dots, eventually turning into large discolored and dry areas. | |
| Thrips | The appearance of a silvery sheen on the upper side of the leaf blades and brown spots on the lower. Over time, the leaves, flowers turn yellow and dry out. | Folk remedies - spraying with infusions: marigolds, yarrow, celandine, tobacco. Treatment with drugs: "Aktara", "Karate", "Fufanon", etc. |
Post-flowering care
After flowering, calla lilies stop watering, wilted peduncles are carefully cut off. Why is it necessary - to maintain the attractiveness of the flower and the growth of new peduncles. In September, the leaves begin to turn yellow, the peduncles droop. In the second half of September, before the onset of frost, the tubers are carefully dug up and prepared for storage.
Calla lilies
Possible growing problems
Some problems arise due to violation of the rules of cultivation and care. If the storage conditions are violated, the planting material will be unsuitable for flower cultivation. Callas that are planted too late may not bloom. If the plants were planted too close to each other, they will be frail and small, and the flowers are inconspicuous. Unsuitable, poor soil will also affect growth and flowering. Insufficient watering in hot dry weather can cause insects to appear. Excessive watering will rot the roots and tubers of the plant. Compliance with simple rules of agricultural technology will allow you to successfully grow abundantly and long-term flowering plants.
Callas flowers are not difficult to grow in the garden, the resistance of the plant itself to diseases and pests makes it easy to achieve success. A flower grower, even with little experience, can grow a lush bush with delicate inflorescences.